April 12 2009
Debugging Preference Panes in Xcode
System Preferences on Mac OS X is a perfect place to put preferences and controls for a background process or framework. Instead of cluttering the user's dock and task switcher with running application or filling their menu bar with little icons, a preference pane allows developers to hide any visual indication of their program until the user is interested in it. On my mac, I have a couple preference panes from third-party developers: BusySync, Growl, and MySQL. All three fit nicely in there; they are background processes or frameworks that I don't want to see unless I want to fiddle with them. Apple has documentation on preference panes and their Cocoa representation, NSPreferencePane.
One issue that quickly arises is debugging. I didn't find it immediately obvious how to hit a breakpoint in my preference pane Xcode project. It turns out to be only a little more complicated than typical debugging: I need to launch System Preferences myself through Xcode after my preference pane is installed to debug it. Here is the step-by-step process.
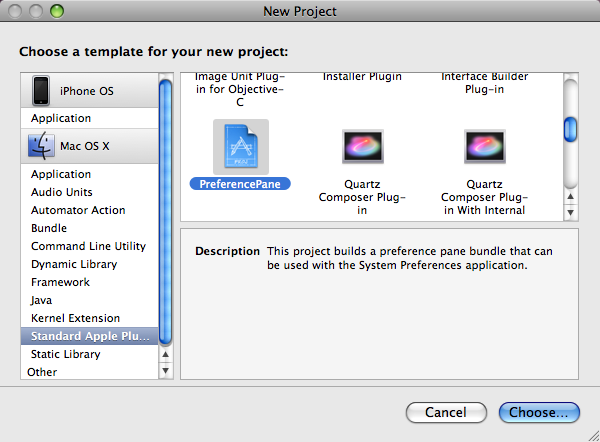
Let's start by creating a preference pane Xcode project. In Xcode, select "File"->"New Project...". Choose "Standard Apple Plug-ins" and then the "PreferencePane" item. Name the project "SamplePrefPane".
Add the following line of code to the SamplePrefPanePref.m:mainViewDidLoad and set a breakpoint on it: NSLog(@"It works!");
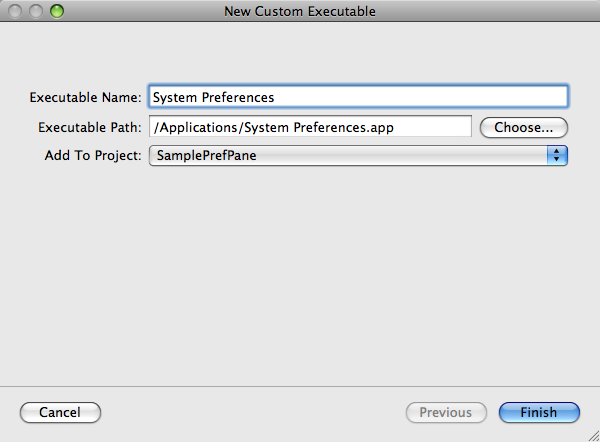
Next, select "Project"->"New Custom Executable...". In the dialog, give the executable a name (this name is what identifies it in Xcode's source list), and enter the following executable path: /Applications/System Preferences.app.
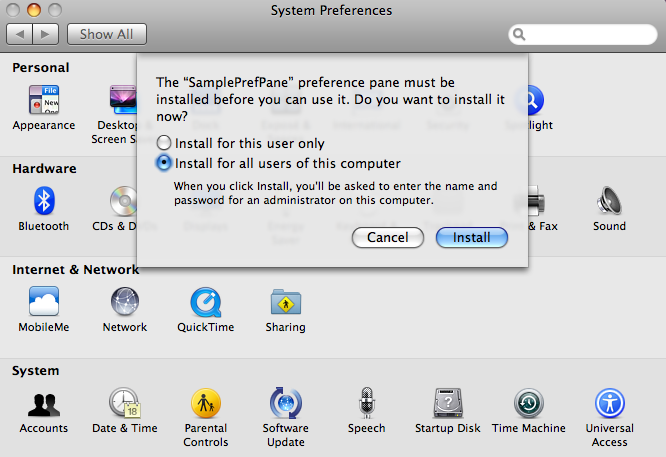
Then, build the project and install the preference pane, located in the "Products" folder. (Double-clicking the built prefPane installs it.) System Preferences will appear and ask whether to install it for one user (in ~/Library/PreferencePanes) or for all users (/Library/PreferencePanes). I generally select all users. After installing the prefPane, close System Preferences.
Finally, back in Xcode, select "Build"->"Build and Debug". System Preferences should appear with the new prefPane along the bottom. Click the prefPane. Xcode should hit the breakpoint placed at NSLog() in mainViewDidLoad.
Caveats
Removing a prefPane: Right-clicking on a prefPane lets me remove it. However, the system is still aware of it. To fully remove a prefPane, remove the file ~/Library/Caches/com.apple.preferencepanes.cache.
mainViewDidLoad: This selector is only called the first time a prefPane is opened. Subsequently, didSelect is called.
File's Owner: In Interface Builder, the main controller has to be "File's Owner". Just update its class to the main controller's.
Localization: NSLocalizedString only looks in the main bundle's .strings file. Use NSLocalizedStringFromTableInBundle in the preference pane. (More info)